Friday, March 30, 2012

Banana Nut Bread


    Uploaded from the Photobucket iPhone App
  • "Waste not want not" remains a good old reminder when it comes to ripened bananas - turn them into banana nut bread!

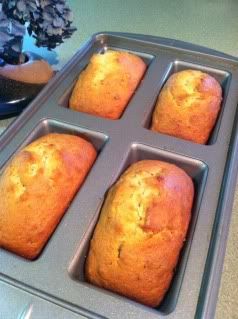
    I use a mini-loaf baking pan to make 4 loaves.  Loaves are handy for a quick dessert with coffee or tea, sliced to pack with lunches, and make a nice hostess gift.  They freeze well.
  • I buy walnuts in bulk and keep them fresh in the freezer, so they're always on hand for baking or salads.
  • Banana Nut Bread
  • Uploaded from the Photobucket iPhone App1/2 cup butter or margarine, softened
    2/3 cup milk
    2 eggs
    2-1/2 cups flour
    1 cup sugar
    1 tsp. salt
    2-1/2 tsps. baking powder
    1/2 tsp. baking soda
    1 cup mashed bananas, about 2 small or 1 large
    1/2 cup chopped walnuts
    Preheat oven to 350
In a mixer, cream butter and sugar.  Blend in eggs and milk. Add flour, salt, baking soda, and baking powder.  Mix until well blended. Add mashed bananas and chopped walnuts, mixing until batter is smooth.

Pour into prepared pan/s (1 large 9x5 loaf pan, 4 mini loaves). A large loaf will bake an hour, mini-loaves take less time, about 30 to 35 minutes.  Insert toothpick in middle to test for doneness.
Serves 12.

Estimated cost $2.40 or less; .60 cents or less per mini-loaf; .20 cents or less per serving.


Shown at:

MeetPenny.com

Friday, March 23, 2012

Balsamic Caramelized Onions for Burgers

Burger with Caramelized Onions, Uploaded from the Photobucket iPhone AppFood shows often feature restaurants or diners serving up special burgers, sometimes with caramelized onions.  I'd never tasted one until a local restaurant recently served a gourmet-delicious onion mixture on my burger with blue cheese.


My daughter and I tried to figure out what ingredients the chef must have used and decided on the ingredients for this recipe.

I'd caramelized onions for French onion soup before, so experimented by adding tastes experienced, and it turned out as delightful or better than the restaurant!
  
Balsamic Caramelized Onions for Burgers
1 medium onion cut in half, sliced 1/4 inch thick
2 Tabs. of butter
2 Tabs. olive oil
1/2 tsp.salt
1 tsp. sugar
Uploaded from the Photobucket iPhone App1/3 cup chopped tomatoes (fresh, sun-dried or salsa)
1/3 cup chopped bacon, (2 or 3 strips)
4 Tabs. balsamic vinegar
Blue cheese and lettuce for toppings
Caramelized Onions, Uploaded from the Photobucket iPhone App

In a 10-inch skillet melt butter with oil on medium heat and let onions cook slowly until translucent, and light golden brown, about 15-20 minutes, turning occasionally.

Add salt, sugar, tomatoes and bacon, and continue cooking until all looks nicely browned and caramelized, about 10 more minutes.  Add balsamic vinegar, cooking and stirring ingredients until vinegar and any juices reduce.

Keep warm until ready to use.  As a time saver, double or triple the batch and keep refrigerated in a jar, or freeze to have on hand anytime for burgers.  I used leftovers the next night to stuff chicken breasts with blue cheese.
Uploaded from the Photobucket iPhone App
Our burgers came on a fresh-toasted bun with melted blue cheese on the burger, then topped with a layer of the caramelized onions and butter lettuce.  I added a seasoned mayo mixture on my homemade buns.

Caramelized Onion Burger, Uploaded from the Photobucket iPhone AppSeason and shape 4-5 oz. of ground beef:  round, flat, and about 1/2 inch thick. Make an indentation in the middle with back of spoon, and fry on medium-high heat for 5 minutes on each side, turning just once.

The indentation helps keep burgers flat, preventing them from swelling in the middle while cooking.  During last few minutes, put cheese on top to soften and melt.  Assemble burgers and enjoy!
Recipe is ample for 4-6 burgers.

Estimated cost: for extra-lean ground beef (85%)  burger, bun, and toppings $1.50 each or less.

Tuesday, March 20, 2012

Breakfast Burritos for the Freezer

Breakfast Burrito
Never had a breakfast burrito until  three years ago when stuck in an airport delayed on a flight.  I spotted a vending machine offering them and gave it a try.  It was tasty, so while consuming it, I tried to figure out the ingredients.  


They can be made with or without potatoes, and prior to making large batches with shredded potatoes, I just scrambled eggs with bulk sausage, chopped peppers and onions, but the basics are sausage, eggs and seasoning.  


Since the freezer is my friend, I now set aside time to make a big batch, wrap in wax coated paper sheets and vacuum seal.  For a quick breakfast, lunch or snack, take out and microwave for about a minute.  This recipe makes a huge batch (24) but can be cut in half.


Uploaded from the Photobucket iPhone AppI keep dehydrated hash browns on hand for several recipes, as we don't eat a lot of potatoes. They're handy (just soak a few minutes in warm water, drain and use). Otherwise, you can boil potatoes, cube or dice and brown with the sausage to use for this recipe.


Breakfast Burritos for the Freezer
1-1/2 cups rehydraded or frozen hash brown potatoes
1 lb. bulk sausage
2 green bell peppers, diced
1 medium onion diced
10 eggs
2 - 3  cups shredded cheese
24, 6-inch flour tortillas, kept warm to easily roll up
salt and pepper
1 cup of salsa (optional)

On medium heat, in large fry pan or chaffing dish, brown sausage and drain grease; add onions, green pepper and potatoes and cook until soft.  In a bowl, beat eggs, seasoning (and salsa if using).

Uploaded from the Photobucket iPhone AppPour over sausage mixture and cook until eggs start to set, and with a spatula turn and mix to keep scrambling eggs until cooked and all mixture is blended.  This is one of those recipes you can adjust:  more or less green pepper, onions or potatoes etc.

Add and mix in cheese. Let cool slightly. Put 1/4 to 1/3 cup of filling in center of warm tortillia, fold and roll, setting aside seam side down.  Let cool and wrap in foil, wax coated paper sheets or plastic wrap to prepare for freezer.

Estimated cost $12; .50 cents per serving or less.


 Featured at: Budget and Freezer Meal Link Up, Basilmomma.com


http://basilmomma.com/2012/10/budget-and-freezer-meal-link-up.html

Sunday, March 18, 2012

Navy Bean Soup

Uploaded from the Photobucket iPhone App
Navy Bean Soup: healthy, tasty, inexpensive and easy to make.  I make one or two homemade soups a week. With homemade soups you control the ingredients like salt, and there's no preservatives! 


Grandma and mom made this often, as did my mother-in-law. They lived through the Great Depression with large families and learned to stretch a budget.


This is my mother-in-law's recipe with the only difference of adding Italian spices, butter, and using chopped bacon, if  I don't readily have ham.  If buying ham bones at grocer, shanks have more meat.


Beans bought in 2 to 5 pound sacks, can also be used in other recipes like salads or humus.  My Italian spice blend comes from the Dollar Store and contains dried  thyme, oregano, marjoram, basil, rosemary and sage. It's my secret ingredient in many recipes!

Navy Bean Soup
2 cups dried navy beans, 1 pound
8 cups of water or broth, canned or with bullion
1-1/2 to 2 cups chopped ham; meaty ham bone or bacon can be used
1 cup chopped onion
1 cup chopped celery
1 cup sliced or chopped carrots
1 tsp. minced garlic
1 bay leaf
1-1/2 tsp. Italian blend seasoning
1/2 stick of butter, 4 Tabs.
salt and pepper to taste
optional: splash of vinegar for serving

Soak beans overnight covered in water. Drain and discard water. In a large soup pot, add all above ingredients, except butter, with drained beans. Bring to a boil, then cover, turn down and simmer until beans are tender, occasionally stirring, about 2 hours.  If using a ham bone, take out, cool, and remove meat. Chop meat and return to the soup.


To thicken soup, take 2 cups of beans with liquid and puree in a blender or pulse with an immersion wand for a few seconds.  Add blended soup back into pot and stir to thicken.  I put the wand right in the pot for a few pulses.  (A potato masher will do; after all, that's what moms used in the old days!) 


Add butter and stir until melted.  Remove bay leaf.  Season with salt and pepper to taste. Serve with a splash of vinegar and/or garnish with a sprinkling of parsley or chives.  This soup freezes well. 

Pressure Cooker Method: Put all ingredients, including dry beans, in pressure cooker and cook for 15-20 minutes according to manufactures directions.  Puree and finish recipe as directed above.


Makes about 4 quarts. 16 servings.
Estimated cost $4.00 or less; .25 cents a serving or less.

Wednesday, March 14, 2012

Skillet English Muffins

Uploaded from the Photobucket iPhone AppI added English muffin rings to my kitchen gadgets and also find them useful for making eggs and small pancakes. The directions on the box produced some great muffins.


They're handy for "McMuffin" breakfasts, Eggs Benedict, small ham and cheese heated sandwiches or mini-pizzas.


Compared to the cost of grocery store muffins, these are money savers!

Skillet English Muffins 
2 Tabs. warm water
2 tsp. yeast
1 cup water
1/2 cup scalded milk
2 tsp. sugar
1 tsp. salt
4 cups all purpose flour
2 Tabs. softened butter
corn meal for dusting

Uploaded from the Photobucket iPhone App
Uploaded from the Photobucket iPhone AppDissolve yeast in 2 Tbls. water for 3 minutes. Combine water, milk, salt, and yeast mixture.  Gradually beat in 2 cups of flour, then cover and set in warm place until it rises, about 1- 1/2 hours.

Beat in butter and knead in remaining 2 cups of flour.  Press dough to 1/4 - 1/2 inch thickness and cut with 3-inch muffin rings. A tuna can with both ends cuts out works well or large glass.  Sprinkle lightly greased baking sheet with corn meal and let cut muffins stand covered until double in size.

Transfer to hot buttered skillet or griddle  (300 degrees, or medium-high) corn meal side down. Cook 5-6 minutes on each side until lightly browned.  Cool on a rack.  Makes about 12-15. They freeze well.

Note: A bread machine can be used for the dough cycle.  Put ingredients in according to machine directions.  Remove dough and shape as directed below. I discovered the texture won't be as "airy," but they'll be very satisfactory.

Estimated cost: .10 cents or less per muffin.

Monday, March 12, 2012

Alfredo Sauce for Shrimp or Chicken


Alfredo SauceAlfredo Sauce offers a tasty alternative to red sauce for pasta or pizza. From scratch it's much healthier and less expensive than jarred sauce. 


I keep a bag of frozen ready-to-use shrimp in the freezer and take out portions needed for recipes; also meatballs.  

Sometimes I use left over chicken or saute a chicken breast to use with this sauce. The sauce is delicious on its own over pasta.

Add a salad, crusty bread and enjoy a 5-star meal at home.


Alfredo Sauce for Shrimp or Chicken 
1/2 cup butter (1 stick)
2 Tabs. flour
8 oz. cream cheese
8 oz. half & half cream or milk
1/2 cup parmesan cheese, or more to taste
1 tsp. garlic powder or minced garlic
black pepper (to taste) 
1 tsp. of Italian spice blend or Italian seasoning of choice
pasta of choice, allow 2 ounces per serving

Melt butter in sauce pan on medium heat and whisk in flour until blended, cooking 1 minute until thickened.  Add cream cheese and whisk until smooth, then stir and blend in half-and-half (or milk). Whisk in parmasan cheese, garlic, herbs and pepper. Simmer until heated through, creamy and thickened. Serves 4 - 6.

Pour over and mix with any pasta, or use for homemade pizza white sauce. Add cooked: shrimp, chicken or meatballs to sauce and heat through. (Allow 3 to 4 oz. per person) and serve tossed with pasta. 


Estimated Cost: $3.00 or less; .75 cents or less per serving with pasta. Shrimp or meat would add $1.10 or less per person. 

Friday, March 9, 2012

Crepes, "Gram's Roll-Up Pancakes

Uploaded from the Photobucket iPhone AppEating "roll-up" pancakes at gram's house was a special treat.  Didn't know they were called crepes until married, but since learned they can be filled and used for terrific desserts, like blintzes or crepes suzette.


I've seen them made with cocoa with a little sugar added for chocolate crepes; and used as lasagna noodles.  One time I used them use for lasagna roll-ups!  Another time as stuffed manacotti.


Whenever grand kids stayed with gram, she made her "special breakfast" with bacon and eggs on the side.  It was one of the first recipes I ask for to impress my husband with culinary skills after marrying.


Of course they became a family favorite for our kids, and now for our grand kids. They're worth the time, but really don't take much more time than making regular pancakes.  


Uploaded from the Photobucket iPhone AppThey freeze well by folding in half and layering flat between squares of waxed paper.  I make a batch to freeze, then reheat  in the microwave for a quick breakfast.  


They're tasty enough with butter, syrup, jam, and/or powdered sugar, but with sides of juice, fruits, bacon, sausage and eggs they make a terrific brunch presentation.


Similar in taste, but much thicker, I also make a German pancake (Dutch Baby) cooked in the oven in a large fry pan for feeding several people at once. My Dutch Baby Pancake was featured at 12-Tomatoes.com in March 2012.
Uploaded from the Photobucket iPhone App
Crepes, Gram's Roll-Up Pancakes
3 eggs
1/2 tsp. salt
1 1/2 cups milk
1 cup flour
oil or butter to lightly brush skillet

Beat eggs.  Add and mix remaining ingredients until well blended.  Fry one at a time on medium high, pouring a thin layer of  batter to cover the bottom of  6-8 inch skillet brushed with butter — about 1/4 cup of batter.

Uploaded from the Photobucket iPhone AppTilt and rotate pan to spread batter thinly around pan. Fry until set with small bubbles and lightly brown on one side, (about a minute) flip and brown other side, about 30 seconds.  Roll up with spatula and place on a platter. Keep platter warm until ready to serve.

Let each person unroll and fix their own with butter, jams, powered sugar and syrup. Makes 12-16 crepes. Approximately 2 to 3 per serving. Serves 4-6.

Estimated cost: $1.60 or less;  .40 cents a serving or less.

Sunday, March 4, 2012

Spinach Bacon Quiche

Uploaded from the Photobucket iPhone App
Here's another delightful crustless quiche, although it can just as easily be made in a pie crust. A stash of frozen chopped spinach is great to have on hand for many recipes such as quiches or Italian dishes. Freshly cooked and chopped spinach can also be used. 

I also keep pre-cooked bacon slices in the freezer.  About once a month or so, I fry or bake a pound or two then store in a freezer bag.  It saves time for breakfast and preparing many dishes calling for cooked bacon.


Quiches are delicious for breakfast, lunch or dinner!  I make them two or three times a month for dinner, then leftovers provide another day or two of breakfasts or lunches.  And they freeze and/or reheat easily.


Add a "decked out" salad for a delightful meal!

Spinach and Bacon Quiche, Uploaded from the Photobucket iPhone App

Spinach Bacon Quiche
3 eggs
1 cup milk
1 tsp. salt
1 tsp. baking powder
1/2 cup biscuit mix
6 oz. or more of shredded cheddar cheese, 2 cups
1/4 cup diced onion
1, 10  oz. pkg. drained frozen spinach
1, 4 oz. can drained mushroom slices
1/2 cup diced cooked bacon

Spray a 9-inch deep pie pan. Preheat oven to 350.

In a 2-quart bowl beat eggs, add milk, biscuit mix, salt, and baking powder, mixing well. Add cheese, spinach, onions, bacon and mushrooms. Mix and combine all. Pour into 9-inch pie dish and bake for 40-45 minutes until set and golden on top. An inserted knife in center should come out out clean. Serves 6-8.

Estimated cost: $4.25 or less; .70 cents a serving or less.

My other posted quiches:
Artichoke and Crab Quiche
Broccoli Quiche
Bacon Quiche
Hamburger Pie
Overnight Breakfast Brunch Casserole

Thursday, March 1, 2012

Cuban Bread, So Easy

Cuban BreadThe fastest, easiest, attractive artisan type bread I've ever discovered!  Saw this recipe online at Cathy's Blog: Bread Experience.Com and had to try.  From start to a "ta-dah" finish takes no more than a mere hour-and-a-half.
Uploaded from the Photobucket iPhone App
Mixing and kneading with mixer takes 15 minutes; the rise 15 to 20 minutes; shaping 5 minutes, then it goes directly into a cold oven with a pan of hot water on bottom shelf; set oven to 400 degrees and bake 50 minutes.  As the oven heats, bread continues to rise and bake.  It couldn't be more simple!
Uploaded from the Photobucket iPhone App
I use active bulk dry instant yeast for about $6 a pound and store in refrigerator.  Jars or packets of yeast can add  50 cents to a dollar per loaf, but bulk yeast costs a mere 4 to 8 cents a loaf. That's quite a savings if making bread often, as I do. Red Star or SAF Instant brands are available on line if your store doesn't carry them, as mine does.


Cuban Bread, So Easy
5-6 cups of bread or all-purpose flour
2 packages or 1 1/2 Tabs. dry yeast, I use SAF Instant
1 Tab. salt
2 Tabs. sugar
2 cups hot water
Sesame or poppy seeds for sprinkling (optional)
Pan filled with about 4 cups of hot water, I used a stir fry pan

Place 4 cups of flour in a mixing bowl with yeast, salt and sugar. Stir until blended. Pour in hot water and beat 100 strong strokes by hand, or three minutes with a mixer flat beater. Gradually work in remaining flour, 1/2 cup at a time until the dough takes shape and is no longer sticky. 

Knead 8 minutes by hand or with a dough hook until dough is smooth, elastic. Place dough in a greased bowl, cover with plastic wrap, and put in a warm (80-100°F) place until double in size, about 15-20 minutes.


Punch down dough, turn out on work surface, and cut into two pieces. Shape each into a round. Place on baking sheet. I used a silicone baking pan, but a lightly greased pan, or parchment paper can be used.  With a sharp knife or razor, slash an  X on each of the loaves about a half inch deep.  Brush or spray with water, and sprinkle with sesame or poppy seeds.  I put sesame on one and poppy seeds on the other.

Place baking sheet on middle shelf of a cold oven. Place a large pan of hot water from kitchen tap on shelf below, (or bottom of oven) and turn oven on to 400°F. Loaves will continue to rise while oven is heating and water steams.  Bake about 50 minutes, or until the loaves are a deep golden brown. Thump on bottom crusts to test doneness.  Loaves should sound hollow.  If using a digital thermometer, it should be done at 200 degrees.


You'll love the look, texture and taste of these beauties!  
Cool  loaves on a wire rack for about an hour before slicing. Makes 2, (slightly over) 1 pound loaves. Freezes well. 


Estimated cost: $1.25 for two loaves.